Quantcast
Channel: DIY Audio Electronics from Zynsonix.com
Viewing all 105 articles
Browse latest View live

Cable Eye Candy - Part II

$
0
0
I wanted to share a few more exciting cables for your viewing enjoyment :)

Below is a 4 pin XLR to RCA cable using a Switchcraft Triple A series XLR, Vampire RCA connectors, and Zynsonix Trebuchet Cable.


This is a mini to RCA cable built for someone with exquisite tastes. It's a round braid of eight strands of Zynsonix Trebuchet wire with all ViaBlue accessories and connectors, including their smaller T6S mini connector (model 30539), their T6S RCAs (30506), and their Y-Splitter. Above the split features soft black nylon.


...and below is a very special speaker cable. This features a braid of Neotech UP-OCC 6Ns copper in Teflon which is then wrapped with multiple layers of teflon, then set in a PV tube sleeved with copper colored nylon multifilament. Above each split is a heavy machined brass Y-splitter, and each gold plated banana is terminated with Cardas silver and gold content solder. These speaker cables made the trek over to a client in South Africa. 


See something you'd like for yourself? Contact Zynsonix for a quick quote.


Pure Silver Mini to Mini Cable

$
0
0
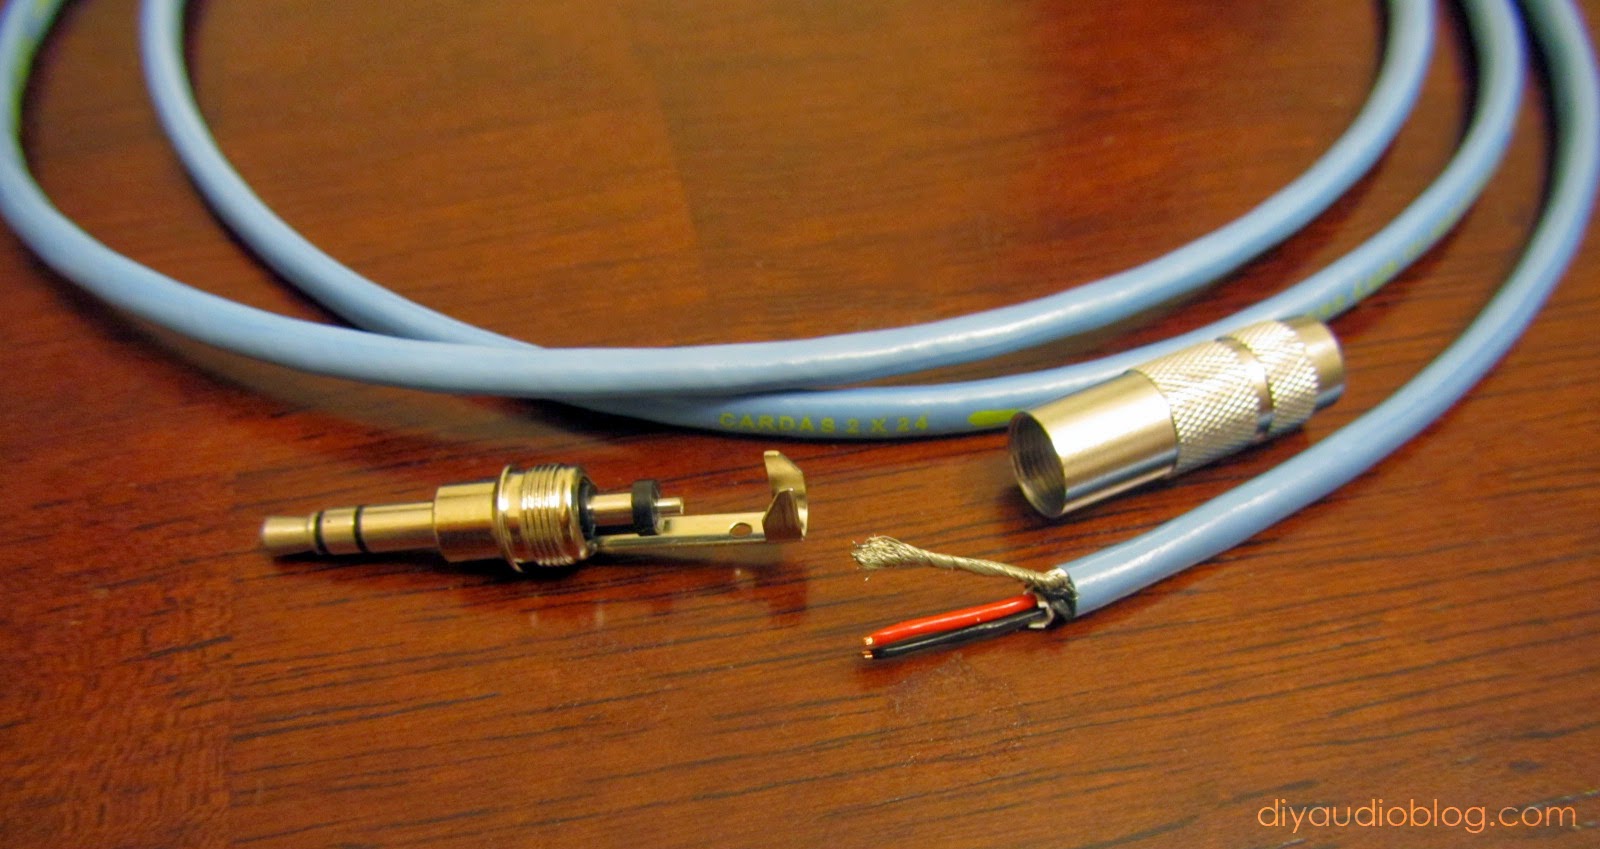
A short mini to mini cable cable can be very handy when connecting a portable audio player to a portable amplifier. In some cases it's worthwhile to use a digital audio output, but not all portable devices offer this, so the venerable 3.5mm mini to mini will work perfectly well. In this particular post, I will be assembling a mini to mini cable using Cardas 5N (99.999% pure) silver wire and a pair of Neutrik mini connectors, the Neutrik NYS-231 BG to be exact. The B in the nomenclature stands for the black shell, and the G stands for gold contacts. This particular connector is chosen over the Switchcraft 35HD and the Canare F12 as the body is smaller and more easily fits on the face plate of portable amplifiers. You'll notice below that the connectors come in three parts, the connector piece with solder tabs, a barrel and a small tube that acts as a dielectric so the left and right solder joints do not short to the barrel, which is connected to ground.

A pair of Neutrik NYS-231BG

You may notice that the barrel inlets are rather small and not completely ideal for thicker sleeved cable. Because of this, I dremeled out the barrel inlet to create a larger opening. 

Barrels dremeled for larger diameter cable

Once this is complete, it is necessary to sand or file the rough areas so they don't grind up against the wire during use. Once the barrels are prepared, the solder tabs should be identified with a multimeter. In this case, the shorter leg A is the left signal (aka tip), the longer leg B is the right signal (aka ring), and C is ground (aka sleeve). 

Pinout of the Neutrik mini connector

As mentioned above, this cable will be using solid silver wire from Cardas. This wire will be sleeved with Teflon (PTFE) tubing. 

Cardas silver wire and Teflon tubing

Each wire is trimmed to the appropriate length and the Teflon tubing is then slipped over top. The Teflon acts as a dielectric and prevents the strands (aka conductors) from shorting to one another. It's a very good idea to get Teflon that's for a larger gauge than the wire you are using so it slips over it easily. In this case, 24 gauge silver is covered with 22 gauge Teflon.

Silver wire sleeved with Teflon

The three wires are braided together and soldered to the Neutrik connector. It's important for the Teflon tubing to go right up to the solder taps to prevent shorting.

Silver wire soldered to the Neutrik connector

Next comes the black nylon multifilament sleeving made by Techflex. This is 3/16" size, cut to length using a hot knife from Partsexpress. The hot knife prevents fraying at the ends by slightly melting where it cuts. Also note the dielectric material is slid in place before the barrel is screwed on. 

Black Nylon Multifilament

The barrel can then be screwed in place, and the other Neutrik connector installed the exact same way. In the photos below, 1/2" heat shrink is slipped over the barrels to provide additional strain relief and to offer the feel of a "rubberized"-type layer.  

Completed mini to mini cable


This can now be the connection between a portable audio player and a portable amp and not take up much real estate at all. Thanks for taking them time to read this post. If you are interested in purchasing a completed mini to mini cable, please contact Zynsonix.com.

For more pure silver goodness, check out a previous post detailing the build of pure silver interconnects

The Fine Print:
The above steps detailing the building of a cable are for entertainment purposes only and not to be performed under any circumstances. The owner of this blog and all associated parties can not / will not be held responsible if you attempt the process posted and cause physical harm to yourself, your surroundings or your property. Please keep this in mind.


Pono Player Balanced Interconnect Cable

$
0
0
So you've taken the plunge on Neil Young's sweet little Pono player, however it uses a unique way to export those tunes to your balanced headphones or balanced rig. I'll be covering how I built an unbalanced cable, and how to build a balanced pair of cables so you can extract every juicy detail from those Hi Res tracks. As you may know, Zynsonix Audio offers these in any length or configuration, so reach out if you need one.

The Pono player features dual stereo 3.5mm outputs. You can use these to output to a pair of balanced headphones, a balanced rig that uses 3 pin XLRs (or mini XLRs / TRS plugs), or a single ended rig that takes good-old-fashioned RCAs.

Neil Young's Pono Player

Stereo 3.5mm connectors have three connections, the sleeve, the ring and the tip. When used in typical applications, the sleeve is a shared ground, the ring is the right signal, and the tip is the left signal. However not the case with the Pono in balanced mode.

Tip, Ring and Sleeve on a 3.5mm mini connector

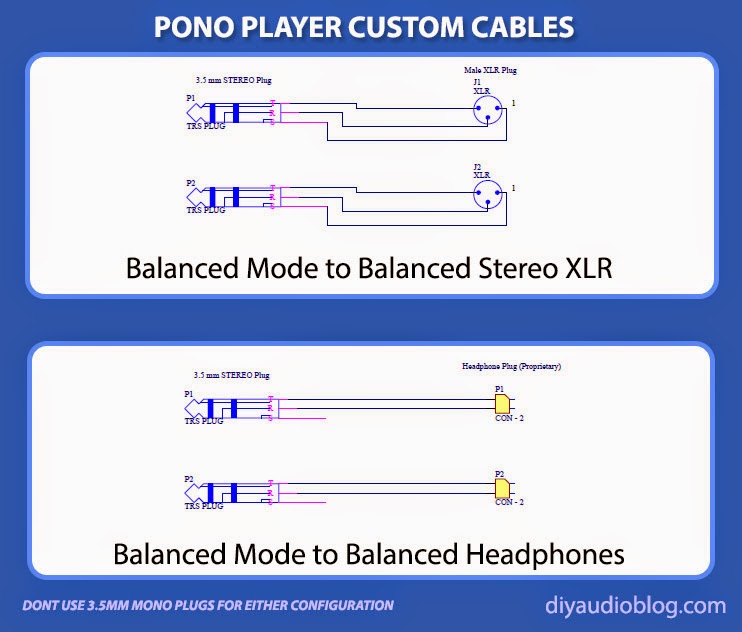
In the case of the Pono player in balanced mode, each of the two 3.5mm goes to an individual three pin XLR. The Sleeve, as you'll note below, connects to the Pin 1 (ground). The Ring connects to Pin 3 (negative). The Tip connects to Pin 2 (positive). For a balanced headphone cable, you will note that the Sleeve connection is not used, only the tip (positive) and the ring (negative). These schematics are straight from the engineers over at Ayre Acoustics. If I'm not mistaken, this is going to be the portable standard for balanced connections including on upcoming models from Sony.

Pono Player wiring pinout / diagram

I made a handy dandy visual for the back of an XLR connector (note mini XLRs are different!) so you can see the pin assignments.

XLR pinout for reference


Below you'll see the pair of 3.5mm stereo mini to XLR cables using the great sounding Zynsonix Trebuchet 99.99997% pure ohno cast copper. The Viablue XLRs are very sleek looking, well made and use set screws rather than a traditional boot or crimp sleeve. The Amphenol mini connectors are my new favorite value connector, they offer a great connection and a recessed area near the barrel that allow them to be used with phone cases and portable DAPs with cramped faceplates.   

Pono balanced interconnect cable

All done and we have a pretty pair of Trebuchet interconnects for your Pono player. Off they go to a happy customer.

I hope you enjoyed this post on building a pair of interconnects for a Pono Player. Please reach out to Zynsonix Audio if you'd like your own custom Pono interconnects (balanced or single ended) or headphone cable, and keep enjoying those high res tracks!


The Fine Print:
The above steps detailing the build of a Pono player cable are for entertainment purposes only, and not intended to be used as assembly instructions. The owner of this blog and all associated parties can not / will not be held responsible if you attempt the process posted and cause physical harm to yourself, your surroundings or your property. 


Chipamp Dual Mono LM3886 Gainclone Speaker Amp

$
0
0
I'll be dipping my feet in the chip amp waters again. I enjoyed the results of my previous Chipamp.com LM3886 build, so I decided to build another, more serious version. You can visit that post to read a little bit about the history of the chipamp, also known as the Gainclone, based on 47Labs Gaincard topology.

As you are likely aware, DIYers have created chip-based builds using a variety of power opamp or audio opamp chips including National Semiconductor LM1875, LM3875, LM3886, and LM4780. The most popular chips being the LM3886 and LM3875. You'll find a number of these designs at Chipamp Electronics.

This more serious build features a pair of Antek 300VA torroids, each with their own shield, integrated amp functionality with an Alps Blue Velvet and multiple selectable inputs, film capacitors on the driver board, and higher end parts like Nichicon Gold Tune power caps, Cardas binding posts, and Cardas RCA connectors.

Cardas wire, RCA connectors and binding posts

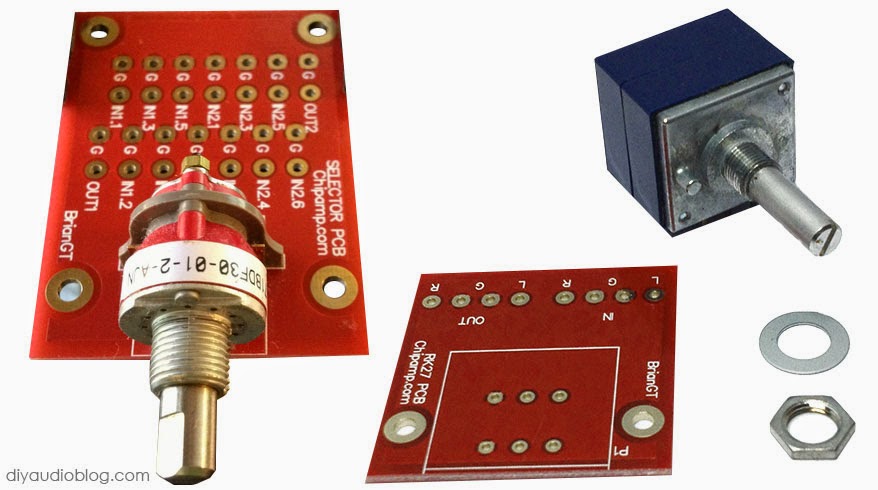
Other nice additions to the build include a 6 position Grayhill selector switch and the Alps Blue Velvet RK27 (100K) volume potentiometer, both with the corresponding ChipAmp BrianGT PCBs. The RK27 board is handy as you don't have to discern which pin is which (the white screen tells you which wire goes where). It's also a little easier that soldering to the little pins. The Grayhill switch's pins are so minuscule that you really have to use the board, it's not like an Elma or Goldpoint with larger gold solder lugs. The nice thing is the combo is a fraction of the price of the fancier selector switches.
  

Chipamp's PCBs for pre-amps / integrated amps

This project would require a larger box than the Bud 7" x 12" x 3" aluminum box I used previously. Rather than build my own gravity mount chassis, I wanted something a little different this time. I turned to Horace Atkinson of www.iagaudio.com for a robust 17.5" W x 10"D x 3.75"H chassis. I stumbled upon his chassis work on eBay: it's a nice combination of aluminum and wood panels for sides, as well as attractive wood accents on the bottom. The metal used in these chassis is a thicker gauge, one piece .125" aluminum tubing, so it can support heavy transformers without any bend or flex. (FYI IAG offers thicknesses up to .188"). The bottom features perforated sheet metal for adequate air ventilation reaching the heatsinks cooling the LM3886. A unique feature is the wood side panels actually act as feet, holding the aluminum portion up higher to allow for ventilation, very cool!


IAG Audio aluminum and wood chassis 

A view of the bottom with the perforated sheet metal removed. Note the bottom of the chassis is not completely open due to the rigid, tubular design, however underneath the wood side panels, there are removable metal panels that can be removed by unscrewing two flush mounted screws to give you adequate access for drilling, etc.

Chassis interior

As noted, the wood panels are all easily removable if you decide you want to access the sides of the chassis interior or change the wood stain, etc. Horace found some beautiful figured maple for me, as you can see below:

Figured maple side panels and accents
After much internal debate, I decided the chassis would be colored to match some of my other equipment with a red and cream color combo, so the wood was stripped down and stained a deep red hue, then given a number of generous coats of MinWax Satin Clear Urethane.  

Red stain and urethane on Maple

Now that the wood is my a nice shiny red, it's time to drill the chassis. After planning out the layout in Photoshop, the chassis is prepped with a ruler and sharpie and taken to the drill press. Many of the holes will be countersunk for this project. The others will be deburred using a Skaviv deburring tool with Cobalt bits. The IEC hole is trimmed using the typical combo of drilling four holes in the corners and using a Dremel cutting wheel to remove the rest. 

Chassis prep

For the heatsinks, I found some reasonably priced ones on eBay that had mounting holes for screws. The instruction manual from Chipamp says you can also use a 3"x3"x1/2" piece of aluminum in free air in certain applications. I installed 1" aluminum standoffs on the heatsinks so I could mount them to the chassis. Small venting holes will be drilled above them, so when heat rises, it can escape the chassis. 


More to come!

The Fine Print:
Please remember that building/modifying circuits can be dangerous to you and/or your surroundings and should only be performed by a certified technician. The owner of this blog and all associated parties can not / will not be held responsible if you attempt a build or modification posted above and cause physical harm to yourself or your surroundings. Many electronics contain high voltages that can kill, and mods, if performed improperly, can be a fire hazard. Please keep this in mind. 


Beyerdynamic Balanced Removable 4 Pin Mini XLR Mod

$
0
0
A client recently sent me one of my favorite headphones to modify, a Beyerdynamic DT770. The DT770, DT880, DT900, and similarly the T1, T5p, T70, and T90 are all intuitive to work with and respond well to new cables and mass loading.

Beyerdynamic DT770 - Pro 80 ohm version

This DT770 would be getting a removable cable mod, which includes the installation of a mini XLR in the headphone cup so the cable can easier be removed for transport or to perhaps have separate cables for portable and home use. The DT770 has room for a mini XLR jack on both the left and right cups, however this user preferred the simpler single ear input. Since I was already going through the trouble, I wired the headphone for balanced operation just in case he ever switches over to balanced listening in the future. The great thing about mini XLR jacks is they lock, so no need to worry about them slipping out like a 3.5mm or 2.5mm. Also, TRS connectors can loosen over time, however this is not as likely with the mini XLR connectors.

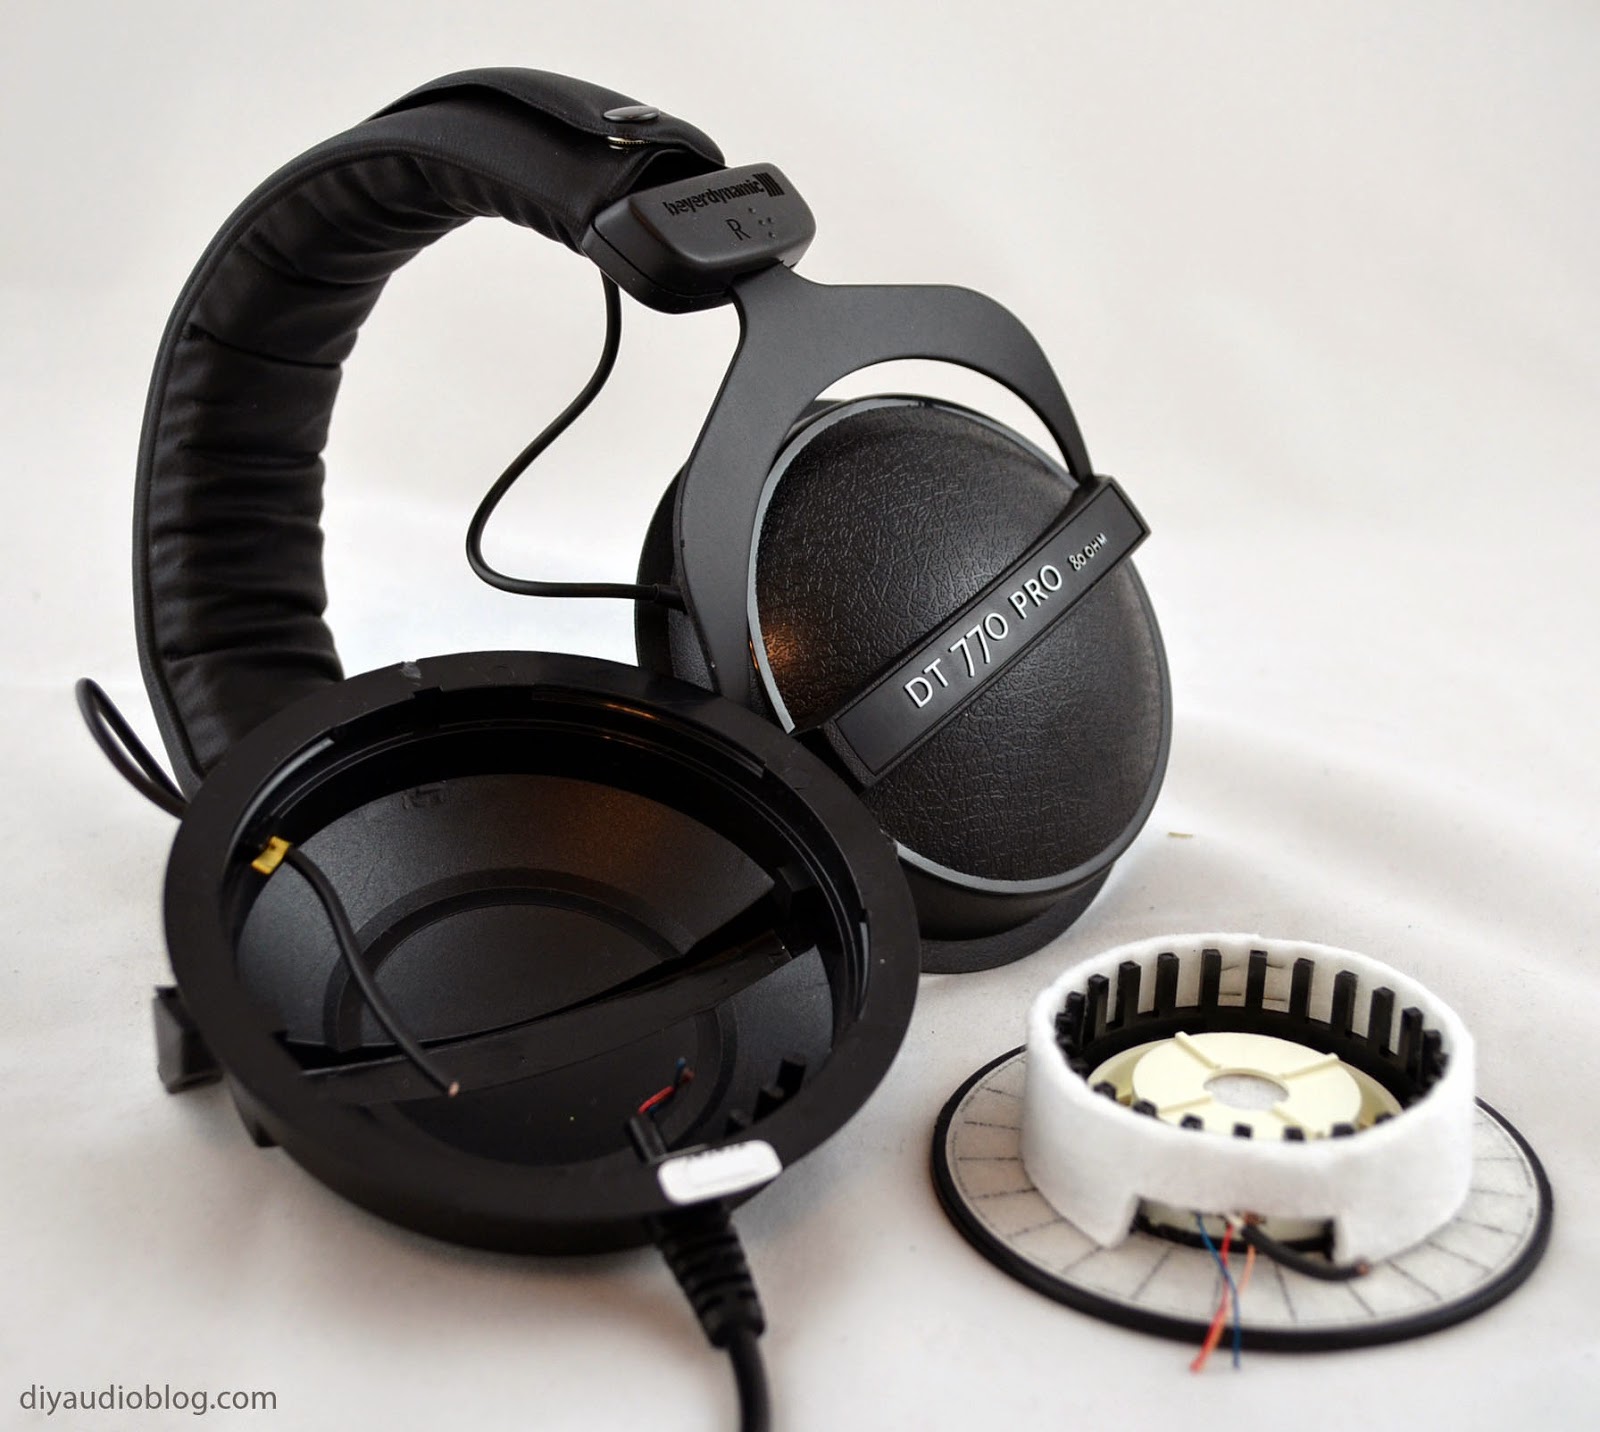
Below is a look at the interior driver. As you can see, the DT770 driver is unique in that it has a felt and plastic ring encircling the center, which reduces the sound wave reflection inside the cups.

DT770 driver and felt/plastic ring


Because the felt and plastic circle reach the plastic backing of the cups, any added mass damping should be clear of interaction. Below you'll note the Dynamat Xtreme installed is a small circle which is measured to fit neatly inside the cup and not cause any clearance issues with the driver. 


Dynamat Xtreme used as mass loading


Beyerdynamics used to come with a round hole, but it's square now that they've revised the manufacturing to some extent. I carefully increased the size of the hole diameter toward the round side of the cup with a Dremel to prevent the plug from getting in the way of the driver. The hole does not have to be absolutely round as the ridge on the mini XLR plugs will cover minor imperfections. 

Dremeled hole for 4 pin XLR mini jack


A three or four pin mini XLR jack can be used. In this case I used a four pin as I wanted the user to be able to upgrade to balanced down the line if he wanted, but in other cases, a three pin can be used as the ground is wired shared as default. 

Nice, clean fit


Wire should be run from one side of the headphone to the other as this is going to be single entry. A twisted pair of Zynsonix Xev silver clad wiring is prepped and sleeved with black polyolefin heatshrink tubing. 

Wire to run from one cup to the other


This can be wired however the user prefers, however I used the XLR standard (pin 1 = left +, pin 2 = left -, pin 3 = right +, pin 4 = right -). 

Wired with Zynsonix Xev silver clad wire


Before re-installation, the driver solder tabs are cleaned of the stock solder.

Solder tabs cleaned of original solder


The new Zynsonix Xev wires are installed using fresh Cardas silver content solder and the felt/plastic cups re-installed. 

Driver wired up and ready


The foam is reseated on top of the drivers and the earpads are reinstalled, so we have a nice clean 4 pin mini XLR input on our Beyerdynamic DT770 now. 

Installation of mini XLR jack complete

And finally we have the finished product featuring some cool colors, in this case rust with a black accent, terminated with a Switchcraft gold plated mini 3.5mm plug and a Neutrik / REAN mini XLR. Now these old Pros are ready for some stylish listening! 


I hope you enjoyed this post, please contact Zynsonix if you have a pair of Beyerdynamics (or any other headphone) that you'd like recabled or modified.


The Fine Print:
The above steps detailing the modification and re-cabling of a headphone are for entertainment purposes only and not to be performed under any circumstances. The owner of this blog and all associated parties can not / will not be held responsible if you attempt the process posted and cause physical harm to yourself, your surroundings or your property. Please keep this in mind.

Speaker Amp to Headphone Converter Box

$
0
0
With the recent proliferation of low and mid sensitivity planar magnetic headphones from vendors such as Audeze and HiFiMan, it's easy to see why headphone enthusiasts are craving more power. Whether it's get that extra bass oomph and ability to listen at higher volumes with less distortion, having headphone amplifiers with between 1-6 watts is becoming more commonplace.

Since high wattage headphone amps are becoming more and more the norm, some have decided to hook up their headphones directly to the speaker taps. That's totally doable in a number of cases (see the speaker to headphone amp cable here) however there are other situations when this is not recommended, such as with tube amplifiers with output transformers. The output transformers can short if they don't have enough load, causing damage to your equipment.

Headphones also have a higher impedance than speakers, so while common speaker amps have outputs for 4, 8 and 16 ohms, headphones are often somewhere in between 32 and 600 ohms. You'll possibly hear noise on headphones from a speaker amp as they are more sensitive than speakers, which creates an unwanted noise floor. So to get rid of these problems, a small resistor network is necessary to modify the load for your amplifier, and reduce the audible noise.

A resistor for each channel is needed to attenuate the volume so that it is more compatible with headphones and help reduce noise, and additional resistor is needed to reference ground (again for each channel). These resistor values will vary depending on the impedance of your cans.

The project starts with a small Hammond Aluminum case. Hammond is the standard when it comes to small project boxes like this. You can get this in anodized red, blue, black or plain silver. the usual suspects have it: Mouser, Digikey and Angela.

Hammond Black Anodized Case

The first task is to punch the hole for the headphone jack. I'm using a Neutrik locking in this case. This particular build is a single ended (e.g. not a balanced headphone jack with isolated grounds). This is only possible IF AND ONLY IF the amp's left and right ground is shared. This is simple to check with a multimeter.

To punch the hole I'll be using a Greenlee punch. This makes a nice clean opening to install the Neutrik locking plug. These are expensive, so only get one if you plan to get good use out of it.

Pilot hole

Fixing the Greenlee in place


And the punched hole

Next is the task of drilling out and installing the binding posts on the back. I found that a vertical arrangement allowed the panel space to be used most effectively.

Binding post installed on back panel


The panel holding the binding posts is fastened to the case with four screws, and two teflon solder posts are mounted on the base of the unit. These can be found at VT4C. The resistors for this application need to dissipate power, and therefore heat, and they need to be large for that purpose. There are various power resistors out there that fit the bill, sandcast, metal oxide, wirewound, etc., but they can't degrade the sound, so I am using Mills 12 watt non-inductive wirewound resistors as we don't want any induction screwing with the impedance. The Mills are well thought of for good sound quality, so it was an easy choice. I've also used the larger Kiwame 5W carbon film resistors in parallel.


Resistors wired up

For the wiring I chose to use some choice Kimber TCSS copper in Teflon. 


Kimber wiring


The front panel is secured with four screws, and the top aluminum panel is slid back into place. I adorned it with a nice little branding element. 


Speaker Amp to Headphone Converter Box Front

Speaker Amp to Headphone Converter Box Back

I hope you enjoyed this post, please contact Zynsonix if you're in need of a speaker amp to headphone converter box.


The Fine Print:
The above steps detailing the building of a speaker amp to converter box are for entertainment purposes only and not to be performed under any circumstances. The owner of this blog and all associated parties can not / will not be held responsible if you attempt the process posted and cause physical harm to yourself, your surroundings or your property. Please keep this in mind.

AES EBU 110 Ohm Digital Cable

$
0
0

The very first real-time software MP3 player was a program called WinPlay3. This program was released way back in September of 1995, back in the days of half gig hard drives. As MP3s gained popularity and began to distract computer users from glorious MIDI music, Winamp from Nullsoft was released in 1997 and by the next year, Winamp in its various iterations was downloaded over 3 million times. Several years later, the first version of iTunes was released to the public in 2001. Fast forward to today, a little over a decade later, and computer audio has become very widely accepted and many audiophiles are more likely to fire up a PC than pop open a compact disc player.

The WinPlay3 Program

Because the CD player is going the way of the dodo (obsolescence), audiophiles choose to interface their PC with a DAC (digital audio converter) in order to extract the music in the best sounding way possible. A DAC requires a digital signal be carried from the PC to the external DAC. In some cases the PC has a direct output for a digital signal from the motherboard or sound card, in other cases, a user may choose to use a USB to SPDIF converter box, such as the M2tech HiFace or Musical Fidelity V-Link to name a few.

Digital signals can be carried a few different ways, either optically or via a coaxial cable. Many enthusiasts frown upon optical cables due to perceived jitter and myriad other issues, although I have found the glass ones to be acceptable in the past. Optical cables actually isolate the ground from one device to another which can be a benefit in the case of a dirty ground at the source. The other option, a coaxial cable with a single center conductor isolated with a dielectric and a return which is typically a copper mesh over the dielectric, can be terminated with either an RCA or BNC.  In the case of the AES/EBU, there is still the copper mesh over the dielectric and there are two conductors in the center.

Standard digital coaxial cables are preferred to be rated at 75 ohms, and since BNC connectors are legitimately 75 ohms, they are preferred, but in many cases BNC connectors are not offered and an RCA will suffice. If you are lucky and your PC output and DAC both have an AES/EBU jack, then you’ll have the best possible connection between your devices. AES/EBU coax cable should be rated at 110 ohms.
AES/EBU, also known as AES3, was developed by the Audio Engineering Society (AES) and the European Broadcasting Union (EBU) way before the first software MP3 player in 1985 (although revised in ’92 and ’03) and is effectively the professional version of S/PDIF. Much more additional information regarding the AES/EBU standard, including protocols, time slots and channel status bits can be found at http://en.wikiaudio.org/AES_EBU.

Musical Fidelity V-Link 192 featuring an AES EBU connection

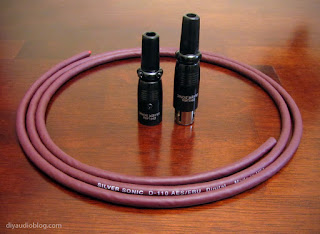
Now that we covered what an AES/EBU is and where it came from, I’ll go ahead and assemble a nice audiophile quality one. One of the fortunate things about the AES/EBU protocol is that is calls for a standard XLR connector, of which there are many audiophile versions floating around, I’m sure some of which use time-corrected flux capacitors and pixie dust gathered during ancient times. I’ll personally be using the DHLabs Silver Sonic XLRs, which is a strange name as the contacts are gold-plated pure OFC copper (no brass!), but they’re great connectors for the dollar, and the DHLabs Silver Sonic D-110 110ohm coax cable, which has silver plated copper conductors within a PTFE dielectric, spacers for constant impedance and a 100% coverage shield.

Silver Sonic D-110 Cable and XLRs

First on the agenda is covering the wire with some nice sleeving. I selected the Techflex brand Carbon Reflex sleeving, which is a polyethylene terepthalate material braided with 3M Ultra reflective monofilament. In simple terms, the weave reflects light and looks pretty impressive.

As noted in the photo below, there are two insulated wires (positive and negative) and a drain wire which connects to the shield for the ground. Also in the center is the Silver Sonic XLR female pieces.

Sleeved with Carbon Reflex

...and here are the Silver Sonic XLR male pieces.

Silver Sonic XLR male connector

Although not necessary, I sleeved the drain wire with Teflon like the other two conductors for uniformity.

Drain wire with Teflon sleeve

These wires are soldered in place on each of the male and female connectors. The ground wire (the drain wire in this case) is soldered to pin 1, the positive wire (red in this case) is soldered to pin 2, and the negative wire (black in this case) is soldered to pin 3. Also note that with the Silver Sonic connectors, slipping the boot over the decorative sleeving requires some patience.

XLR Pin Diagram

Once everything is soldered in place, the barrels of  the DHlabs connectors are slid over the soldered connections and the three screws over each connector are replaced. The two screws over the boot in the back back a very substantial strain relief system. Below you will see the finished digital AES EBU cable. 

Finished digital AES EBU Cable


Hope you enjoyed reading this post. If you are interested in having your own custom digital AES EBU cable (or any other cable) made, please contact Zynsonix for a quote.


The Fine Print:
The above steps detailing the building of a cable are for entertainment purposes only, and not to be performed under any circumstances. The owner of this blog and all associated parties can not / will not be held responsible if you attempt the process posted and cause physical harm to yourself, your surroundings or your property. Please keep this in mind.


Capital Audiofest 2015 - Volti, Fyssion, and Daedalus Audio Speakers

$
0
0
I attended Capital Audio Fest 2015 in Rockville, Maryland to not only hear the latest and greatest audio equipment, but to connect on a personal level with other enthusiasts. Zynsonix Audio is a small, boutique company where I enjoy what I do, hand-building cables for audiophiles and hopefully sharing an conversation or two about the hobby and what it means to us. There were many others in the same boat attending CAF, their business priorities occasionally taking a back seat to the passion they have for creating truly unique offerings to others around the world. There were many listening rooms in the Hilton, with 50+ vendors being represented.


It's tough to be an aging audiophile! Things that may have impressed you early on in your search for the holy grail in sound reproduction now likely fall flat on your ears. That being said, when you hear something really groundbreaking after decades of listening, you know that device, speaker, headphone, etc. is truly special.

Three rooms truly stood out to me, not only amazing sound, but for other reasons as well.

Volti Audio were in attendance with their splendid Vittora,($25K), a large horn speaker which has a resemblance to a Klipsch La Scala II, however it's much prettier and the internals have a more modern touch. These speakers had a great presence, very refined, slightly warm, and filled the room with beautiful music.

The Volti Audio Vittora

There was also Daedalus Audio with their Poseidon V.2 speakers in solid maple (dove-tailed and everything! Appx. $22K as configured). These speakers were crystal clear and covered the entire spectrum of sound equally well. They were slightly more forward sounding than the Vittora, the treble energy to the enveloping mid-range to solid, well damped bass was perfectly balanced to these ears. Truly an amazing set of speakers.


Daedalus Audio Poseidon V.2 speakers 


And perhaps the most surprising of the bunch was Fyssion Audio. Easily the most entertaining of the rooms, I was greeted by four enthusiastic gentlemen who were eager to present the fruits of their labor. I didn't know what to expect, it was my first time hearing about the company, and the speakers were very unique in appearance. The gentlemen went in order of progression from their first creation, the Profound Round, which is a tubular speaker which is wrapped in leather and sits a top a wooden tripod (very vintage chic, high WAF here guys), to their newer creations, which included the Mighty Mini. The differences between the models were very apparent. JC of Artisan Audio, parent company of Fyssion, mentioned that the Trinity Engine, the branding for their unique design configurations, was based on empirical design (i.e. if it doesn't sound amazing, scrap it and try again until it's just right). Once the right dimensions were discovered, they use a CNC to accurately create the panels for these speakers.

All of these speakers in the lineup were great performers in their own right, however the ones which really blew my mind was the XY 30X30 series (the smallest of which the aforementioned Mighty Mini). They're called 30X30 as the drivers face 30 degrees away in each direction, something I hadn't seen done before. These speakers may look diminutive in size, however the sound-stage they created was worlds better than anything else I had heard. You could stand almost anywhere in the room and still have really nice imaging, these are not speakers where you must be in the center seat with high frequencies at ear level. Not only was the soundstage immense and enveloping, but the sound quality itself was top notch, with crisp, clear tonal quality.

Fyssion had many speakers from it's lineup on display 


I think what's exciting here is that these speakers are small enough that they could fade away into a living room or den with the right finish. The Mighty Mini measuring 8" x 12" x 20" and its bigger brother the XY 30X30-4 measuring 16" x 11" x 26" perform like far larger speakers, Supreme WAF (wife approval factor) and ZERO sacrifice in sound quality. I'd imagine these speakers would be excellent for video game and film enthusiasts too, livening up the experience with enveloping sound.


My personal favorite, the Mighty Mini 


Cost for the Mighty Mini starts at $3,500, quite a bargain compared to the other speakers in attendance. Fyssion earned a best in show award at Capital Audio Fest, so evidently others were equally as impressed. I'd highly encourage you to seek out an audition of the Fyssion offerings, very impressive in my book.


Headphone Connectors & Pins / Pinouts for DIY

$
0
0
So, as you have probably noticed, headphone manufacturers are not very good about standardizing connectors for use with headphones and amplifiers, to the point of absurdity. I am going to try and document most of the different headphone connector pin diagrams aka pinouts in one place so you don't have to pull out your hair tracking them down. If you need a cable built with any of the connectors below, reach out to Zynsonix Audio.


The 2.5mm TS with narrow shoulders originally was created for use with the Sennheiser HD700 headphone cups, but now has also been adopted for the Oppo PM-1, Oppo PM-2 and can potentially be used with the HiFiMan 400S, HE-560, HE-1000 and Edition X as the stock TRS does not use the ring (R). The tip is used for signal/positive, and the sleeve is ground/negative.

Recommendations: The best I've found are unbranded/generic connectors with the gold plated connector, chrome barrel and "long shoulders" which looks like the illustration above. I don't advise the other plastic/nickel plated plugs.

______________________________________________________________


The 2.5mm TRS is found on some mobile phones, although most use the ubiquitous 3.5mm TRS. The tip is left signal (L), the ring is right signal (R), and the sleeve is ground (G).


HiFiMan headphones (New Models): includes the updated HE400S and HE560, HE1000 and Edition X, which use this connector at the cups. Per measurements, the tip is the positive, the sleeve is the negative, and the ring doesn't appear to be used. 

Recommendations: There aren't many quality 2.5mm TRS connectors out in the wild, the best of which are unbranded ones coming from across the pond (China / Hong Kong). 


_____________________________________________________________


The 2.5mm TRRS is commonly used for balanced operation for Astell and Kern portable digital audio players. Tip is right negative (R-), ring closest to tip is right positive (R+), ring closest to sleeve is left positive (L+) and sleeve is left negative (L-).

Other applications: 
Onkyo portable DP X1 DAC: Tip is right negative (R-), ring closest to tip is right positive (R+), ring closest to sleeve is left positive (L+) and sleeve is left negative (L-).  : Source

_____________________________________________________________

The 3.5mm connector (aka mini connector) is the most common plug used for portable audio. The tip is left signal (L), the ring is right signal (R), and the sleeve is ground (G). 

Recommendations: There are great options out there from Switchcraft, Furutech, Canare, Oyaide, ViaBlue, Amphenol and more. The Switchcraft 35 HD series is a great place to start for a rugged, U.S. made plug.


_____________________________________________________________


The 3.5mm TRRS has quite a few applications:

iPhone and many other mobile phones: The tip is left signal (L), the ring closest to the tip is right signal (R), the ring closest to the sleeve is ground (G), and the sleeve is the microphone connection.

Oppo PM-3 headphones: This is used for the balanced cup connection for the Oppo PM-3. Per Oppo, the tip is L+, the ring closest to the tip is R+, the ring closest to the sleeve is L- and the sleeve is R-

Hifiman HM-901: Tip is L+, the ring closest to the tip is R+, the ring closest to the sleeve is L- and the sleeve is R-

Geek Out V2: Tip is L+, the ring closest to the tip is R+, the ring closest to the sleeve is L- and the sleeve is R-

Custom Red Wine Audio can feature this jack: RWAK240, RWAK380 and MZAK240

JH JH3A digital connection - Tip is left (L), ring closest to tip is right (R), the second ring handles digital coaxial information, and the sleeve is ground for both analog and digital.

_____________________________________________________________


The 1/4" TRS (aka 6.25mm TRS for the metric folks) is the most ubiquitous plug for home/studio headphones. The tip is left signal (L), the ring is right signal (R), and the sleeve is ground (G).

Recommendations: I find the Neutrik NP3C-BAG to be a great value 1/4" connector and the Furutech FP-704 (G) to be a great choice if you want to spend a few more dollars.  

______________________________________________________________


The mini XLR has become quite popular in the headphone market as it is relatively small, it locks in place, and the connections are more reliable than your average TRS. The mini XLR 3 pin is commonly used by AKG for their K-240S, K271 MKII, K701, K702. K712 and other K701 derivatives like the Quincy Jones Q701. The pins are labeled on nearly all mini XLR connectors, though you may have to look under a light to see them.

For the standard AKG wiring, pin 1 is ground, pin 2 is right signal and pin 3 is left signal. 

Recommendations: The tried and true is the Switchcraft TA-3, however I prefer the REAN RT3FC and RTCMC models at the same price as they seem a little more sturdy and have two different strain relief sizes depending on your wire size. The Furutech FT-610 resembles the Switchcraft, however has nicer rhodium plated connectors and looks a little prettier. Bottom line, if you want the best available, go with the Furutech, and if you need the best value, go with the REAN. 

_____________________________________________________________


The standard-sized XLR is used for a few different applications. As an audio interconnect, Pin 1 is the ground, Pin 2 is the positive signal, and Pin 3 is the negative signal. You'll notice that most XLRs have the pins labeled 1, 2 and 3 if you look closely enough.

Recommendations: The Neutrik XX series is a great value. I also like the solid weight and feel of the Switchcraft AAA series, and they're two piece, so a little easier to assemble. If you'd like super solid and have a couple more bucks to spare, the Furutech FP series is a nice choice.

_______________________________________________________________


Headroom initially debuted their first balanced headphone amplifier in a dual 3 pin configuration (I suppose if someone wanted to have headphone monoblocks in the future), however the 4 pin XLR proved to make more sense as it's an easier, less cumbersome implementation. You'll notice that most XLRs have the pins labeled if you look closely enough. Pin 1 is L+ (left positive), Pin 2 is L- (left negative), Pin 3 is R+ (right positive), Pin 4 is R- (right negative). Nearly all balanced headphone amps use this configuration, as well as the legendary AKG K1000. 

Recommendations: The same recommendations from the 3 pin XLRs are echoed here: Neutrik XX series is a great value. I also like the solid weight and feel of the Switchcraft AAA series, and they're two piece, so a little easier to assemble. Furutech also just released (FINALLY!) a 4 pin XLR, the FP-705 in 2016, which is a great choice for a few more dollars. 

_____________________________________________________________


The Kobiconn Auto IRIS is an odd little connector typically used with cameras. These are found on Ray Samuels (RSA) balanced portable headphone amplifiers like the Protector and SR-71B, however are also on amplifiers Centrance GloveAudio A1, HiFi M8, and the ALO Rx Mk3 B. Pin 1 is left positive (L+), pin 2 is right positive (R+), pin 3 is left negative (L-), and pin 4 is right negative (R-).

_____________________________________________________________


The Male SMC connector is used to connect to older HiFiMan headphone cups, and current models such as the HE-6. As you can see from the pinout, the signal is the small center pin, and the ground is the textured area at the end of the connector. Care should be used when soldering the ground, as using too much solder will prevent the brass cover from sliding over.

______________________________________________________________


The Sennheiser HD connector features two pins. It's difficult to notice on a quick glance, but one is larger than the other. The larger pin should be used for ground/negative, and the smaller pin is signal/positive.

Recommendations: There are only a couple of DIY connectors out there that are compatible with the Sennheiser HD265, HD525, HD535, HD545, HD565, HD565 II, HD580, HD600 and the HD650. ... Cardas and Furutech, the Cardas HPSC and Furutech  FT-2PS.

The Cardas HPSC is reasonably priced ($~16 as of this writing), but not ideal for beginners. It's a flexible molded plastic with not much room for the wire to be soldered to the internal pins, and the rhodium needs to be heated enough so the solder takes, but not enough for the plug to melt. Flux can be helpful for this, and I personally fill the cavity with a plastic-like hardening adhesive for longevity. The Furutech FT-2PS runs quite a bit more (~$46 as of this writing, but makes the soldering much easier by separating the pins with plastic, features an internal clamp for strain relief, is made of tough plastic, and looks great. So personally, I would purchase the Furutech unless cost is an issue.


This is a work in progress and many more connectors are coming. 


The Fine Print: This page is for entertainment purposes only and is not intended to substitute or supercede what a manufacturer states or recommends for their product. Zynsonix Audio, LLC does not furnish any guarantee for the accuracy of information herein, and does not assume responsibility for damages sustained by entities referencing this information for any reason. 

Zynsonix guarantees all cable and headphone work performed by Zynsonix Audio, LLC to be correct, however does not guarantee the work of other entities, whether individuals or businesses, that make use of this information. 

DSD, DXD, DAC, and what do they all mean to me?

$
0
0
DSD, DXD, DACs, and what do they all mean to me? 

Compact Disc players are now piling up next to VCRs in the local landfill as frugal audio enthusiasts and deep-pocketed audiophiles alike migrate to computer/digital-based audio setups. DACs (Digital Audio Converters) have become a cornerstone of many digital-audio systems as they effectively do what CD players used to do, convert digital bits into an analog music signal so our ears can appreciate it. Depending on the circuit and parts used, one can have a warm and musical sounding DAC (check out MHDT offerings and the Ack! DAck), a crisp and detailed DAC, or neutral DAC with flat frequency response ideal for audio or video editing (like the Benchmark DAC1). As such, different listeners will prefer different DACs and auditions and/or trusted reviews can help with a decision (InnerFidelity.com and HeadFi.com are great places to start).

While we note that different parts/circuits affect the sound quality, technical features also play an important role. The latest feature that has been on many audio enthusiasts’ minds is DSD, or direct stream digital, so much so that nearly all new full-featured DACs coming out include DSD and DXD decoding. DSD is a higher resolution format than the typical PCM format on audio CDs, as well as other lossless options such as FLAC (Free Lossless Audio Codec) and ALAC (Apple Lossless Audio Codec). DSD technology is complex enough that I could fill several pages with the tech details, but that's not really my modus operandi for this blog, just trying to keep things simple, To summarize briefly, DSD is a technology pulled from Sony's SACD, it's 1 bit (vs. CD's PCM at 16bits) consisting of 1s and 0s increasing or decreasing the amplitude, sampling 64 times as often as a CD does. So in theory, DSD is more "analog", filling in gaps in the sound wave. Some people refer to this as DSD64, as there is double rate DSD (DSD128) and quad rate (DSD256). DSD256 samples 11.2 Million times per second and the average album is a mere 8 to 10 gigabytes. Here's a handy dandy chart I made showing the difference in sampling and file sizes for each DSD format.


Given 4TB hard drives are very affordable, I don't see the size being an issue unless you're trying to take a lot of DSD albums on the road. 


Do you need to drop everything right now and invest in DSD? 

Most of us associate upgrades in technology with costs of new equipment, replacement of media, and often times inconveniences if the technology is in an early adoption stage. Fortunately, there are low-cost DAC options supporting DSD, including the iFi Nano iDSD at $199. Noting that six of the ten most popular DACs on Amazon cost that much or above, $199 would not be a barrier to entry for most enthusiasts. In terms of cost and availability of media, there are several thousand tracks available on sites like Highresaudio.com and hdtracks.com from $15-30, not much more than an album from iTunes and comparable to a vinyl LP. As time goes by you'll see more and more classic albums carried over, but there is obviously still a lot of music not in DSD format.

Reading various reviews across the web, forum fire-fights, statistics from blind tests and a litany of posts in audio forums, some people can hear a difference between PCM and DSD and some can't. Sound engineers can't edit in the one-bit environment necessary for DSD, so many of the DSD recordings are edited, mixed, and mastered in DXD (which is a very high resolution PCM format) or DSD-Wide. This may be the reason some people can't hear a difference: if a recording is being converted to PCM and then back to 1-bit DSD I would assume there would be a loss of data due to the sampling differences. If you'd like to chime in below, you are more than welcome.

The best thing to do is first see if the albums you enjoy are available in the format. If they are, DSD isn't very expensive to try, pick up a Nano iDSD or other device and see if your ears hear a difference. If you're already in love with your non-DSD capable DAC, it's safe to keep it around a little while longer ;)


References if you want to do some more reading:

Direct Stream Digital. (n.d.). Retrieved March 30, 2016, from https://en.wikipedia.org/wiki/Direct_Stream_Digital

Hansen, C. (n.d.). Ayre Acoustics Design Thoughts. Retrieved March 30, 2016, from http://www.ayre.com/insights_dsdvspcm.htm

McGowan, P. (2012, November 19). How dense are you? Retrieved March 30, 2016, from http://www.psaudio.com/pauls-posts/dense-you/8874/#comments

Zwickel, B. (n.d.). DSD vs. PCM: Myth vs. Truth. Retrieved August 19, 2015, from http://www.mojo-audio.com/blog/dsd-vs-pcm-myth-vs-truth/


IsoAcoustics Aperta Bookshelf Speaker Stand Review

$
0
0
When I went to Capital Audio Fest last year, I noticed an interesting little stand underneath a few of the bookshelf speakers at the show made by IsoAcoustics. I personally do most of my listening at a desk, whether it be my computer desk or work bench, so any opportunity to enhance that (sometimes not ideal) listening experience is very welcome. I say sometimes not ideal as with freestanding speakers or bookshelf speakers on stands you have more freedom to move them to an ideal position away from the wall, etc. and they typically sit directly on the desk, which doesn't give them any isolation.

While I like my Auralex Subdude, their low-cost MoPads aren't the most attractive isolation solution for monitors. The Propads look better, but angle adjustments are somewhat limited.

The Auralex MoPads, an effective though homely solution

The Propads with 3 layer dampening

The IsoAcoustics stands were initially offered in plastic, which still didn't really turn any heads in my humble opinion either, however IsoAcoustics recently released the Aperta, and now the larger Aperta 200. IsoAcoustics has a nice online calculator to let you know if they'll work with your speakers.


These puppies look great, are crafted of solid aluminum, have good heft and are built to last.

The Aperta is available in silver and black
You can purchase an aluminum platform so you can place them on top of most speaker stands too. Two of the four feet per unit are height adjustable, so you can adjust the axis of sound and get those tweeters at optimal ear level.

Simple yet effective height adjustment system

Decoupling your speaker from your desk using the Aperta offers some very notable benefits: Bass is more punchy and less muddy and the overall sound is clearer and more dimensional. Getting the speaker away from the surface of the desk below reduces the deleterious effect of distortion caused by first reflections (Linkwitz has a great article on speaker floor reflections if you'd like to learn more). I did find that bass quantity decreased (bass generated from vibrations emanating off the desk), so you may have to turn up your subwoofer a bit to compensate if you have grown used to that level. If you are decoupling your monitors from your desk for editing purposes, you'll be getting a more accurate frequency response as a result.

Are the IsoAcoustics stands worth the $200 to $250 a pair they are selling for? I'd say absolutely if you are an audiophile, audio enthusiast, or sound/video editor. In the audiophile segment they are a relative bargain, you'd pay that much for a typical three point isolation system for one single speaker. If you're looking to pick up a pair, they're pretty much the same price everywhere, but I'd recommend reaching out to Ryan at FrontEndAudio.com. No relationship, but he was very pleasant to deal with and shipped it off to me quickly... free shipping doesn't hurt either ;)

If you have a few more dollars to burn, IsoAcoustics has relationships with partner companies that incorporate their product into stands and purpose-built editing consoles. Argosy is a company that makes the latter, and man would I love to have one of these: The Halo workstation is available for $1,500-2,500 depending on the options, and while great for an editor, I could totally see this being used as a computer desk with plenty of room for amp, pre-amp, DAC and headphone amp, all at at arms length but not in the way.

The Argosy Halo Workstation
I hope you enjoyed the review. As always, if you are looking for a new set of cables to improve your audio system, be sure to check out Zynsonix Audio for some great solutions.


Bowers and Wilkens B&W P5 Audio Cable

$
0
0
The Bowers and Wilkens P5 is a luxurious looking portable headphone with some nice comfy pads. Unfortunately B&W did not make replacing the cable with something custom very easy. First, finding a plug to fit into the jack inside the cavity behind the ear pad requires trial and error, ordering small connectors from overseas and hoping that they fit when they finally arrive. The second matter is getting the wire to fit in the tiny little tributary that leads to the bottom of the unit. However, if you are patient, it is possible to overcome these obstacles. Below you will see the unit with a single pad removed and the dis-connectable cable exposed, note the silver area where the cable feeds through.

Bower and Wilkens P5 headphone cable


The first task was to find a small bodied 2.5mm connector that would physically fit in the unit. For this you pretty much have to spray and pray, ordering generic (no name brand) connectors by eye from AliExpress or eBay and hoping you end up with one that fits a couple weeks later once it crosses the pond. I found a unit with a set screw on the barrel that fit perfectly. Do note that the extended slim barrel typically used for mobile phone case clearance was necessary here to go through the "pinched" area near the jack.

Narrow bodied 2.5mm connector

You could also use a connector with a larger barrel, but leave the barrel off and use heatshrink over the area the barrel would normally cover. Be very careful with the amount of heatshrink used and the length as the cavity doesn't give much room for error. The below images will give you an idea of how much I used, and even then, when the barrel was screwed on, I needed to reheat the heatshrink to give it a mild angle downward to fit.


Small bodied 2.5mm plug with barrel

Three runs of 24 gauge Trebuchet wire were used, and there actually was not enough clearance. The dielectric needed to be heated and pressed several times to fit into the "tributary" that leads to the bottom of the 'phones. You can click the image below to zoom in and observe the tight clearance. I'd recommend 26 gauge wire with thin dielectric if you have the option.


Once all is said and done, a big bottleneck is removed from the P5 and your ears will thank you for it.


If you'd like a custom cable built for your B&W P5 (or any other custom audio cable) please visit Zynsonix Audio.


Massdrop x Fostex TH-X00 Recable - Removable Mod

$
0
0
I was quite excited to head about Massdrop and Fostex teaming up to offer the TH-X00, a headphone created by the same OEM company that produced headphones for Denon (the legendary D2000, D5000 and D7000). I still to this day feel that the D2000 was the best headphone in this price range, and the D7000 is still an amazing sounding headphone compared to the latest and greatest. With this Massdrop Fostex team up, audio enthusiasts would be able to get very solid drivers that are similar to the Denons with luxurious wood cups at a very attractive price point.

An interesting phenomenon with the Denon headphones was that they were extremely receptive to a new cable (despite the stock cable being fairly decent construction). In fact the sound changed more than any other headphone I've heard, aside from the HD600, which was close (try a solid silver in teflon cable and a Cardas copper cable side by side with that one). The TH-X00s seem to follow that trend from my brief impressions (had to get them back to a client quickly).

I found the Zynsonix Xev had nice synergy with the D2000, opening up the highs and adding coherence, so that's what was used with the TH-X00s. The Xev is a silver clad copper design which has a detailed signature. It's hand braided, which you can see below, from a four wire litz braid to two twisted pairs, then sleeved with a soft black non-microphonic sleeving.

Hand braided Xev cabling

This particular headphone would have a removable/replaceable cable cable option, so whenever there is an option, I prefer to use 4 pin mini XLRs. They have a great connection, lock in place, and are used for many Audeze headphones. Since few headphone manufactures use the same connectors, we can try and standardize to some degree, so this design would not only be able to use Audeze cables, but the cable could also be used with Audeze headphones. For that to happen, the pins need to be shorted on both sides (male and female), note the small piece of bus wire connecting two pins below. You can learn more about this in a previous post.

Shorted pins for Audeze compatibility

You guys have seen me build enough cables, so we're not going to cover that, but how the wire is attached internally in the Fostex TH-X00 headphones. The pads have four plastic connectors that fasten to the cups, twisting them to the left allows them to be removed quickly and easily.

Fostex TH-X00 with removed earpad

Four screws need to be removed to remove the wood cup from the frame, then another four screws are removed to separate the driver and wood cup. 

Removing the cup from the frame

The existing cables feed in through the frame, go about an 1/8th of a turn up the cup, then enter the driver chamber. At that entrance point the cable is tied in a knot and there is a bit of epoxy/rubber cement that holds the old cable in place as a strain relief system. It's important to recreate this with the new cable to prevent damage to the soldering tabs on the driver from an inopportune yank. I personally use a special adhesive gun that creates a plastic-like joint holding the cable firmly in place. The wire is soldered to the top two pins, the red marked one being positive, the other negative. These joints should be quickly formed to avoid harming the driver and/or the thin wires leading to the diaphragm. 


Interior driver view with strain relief

While everything is taken apart, it's a good opportunity to add a bit of mass damping to the inside of the wood cup. Dynamat Xtreme, or other automotive based damping materials work here. This helps tighten up the bass. Tweaking the amount can be to preference. Since the cup is nice solid wood, only a moderate amount is necessary. Were it flimsy plastic, it would likely need a lot more. 

Dynamat Xtreme mass damping

The headphones are reassembled the same way they were taken apart. The "pigtails", or little dangling mini XLRs may look like they'd get in the way, but with the headphones on your head they are very hard to notice. Flexible joints assist with that. Removable cables are great for people who like to experiment with different cable types, lengths (portable vs. home), use one cable for multiple headphones... or who have teething pups or curious felines. The Xev is actually pretty strong against cats :)


The finished / modded Massdrop x Fostex TH-X00


If you've taken the plunge on a sweet set of Massdrop x Fostex TH-X00s and are itching for a recable, please check out Zynsonix Audio


The Fine Print:
The above steps detailing the modification and re-cabling of a headphone are for entertainment purposes only are not intended to be instructional. The owner of this blog and all associated parties can not / will not be held responsible if you attempt the process posted and cause physical harm to yourself, your surroundings or your property.


Chord Mojo Headphone Amp and DAC Review

$
0
0
If you've been an audio enthusiast for very long, you've no doubt heard of Chord Electronics, a plucky U.K.-based audio company known not only for their great sounding devices, but wildly creative chassis designs. They're much more playful than the typical stoic aluminum rectangles we're all used to seeing stacked on shelves at the local A/V retailer (why did that become a trend in the first place? Boring!).

While you may have known Chord, you probably realized that their wares were a little pricey for the student or cost-conscious audiophile. In a shrewd business decision, Chord decided to make a device that was much more financially accessible, the Mojo. The Mojo is the Hugo's little brother, hitting the streets in 2015 and has been wildly successful, and is still pleasingly made in England.

The Mojo is a sweet little palm-able device that decodes a digital signal and acts as a headphone amp. It makes a nice companion for audio enthusiasts who are on the go with their Samsung or Apple phones listening on Tidal or whatever format their heart desires. For the record, I love Tidal, if you can get over that they only have about 80% of Spotify's library and understand the playlist game isn't too hot, the quality is surprisingly excellent and well worth the price of admission. 

For the inputs, there is a mini coaxial, full size optical, micro USB for charging, and micro USB for music input. Both the coaxial and USB inputs can accept PCM up to 32bit/768kHz and DSD up to DSD256. The optical can go up to PCM 24bit/192kHz, but no DSD. One important thing to note for Apple users, you will need an Apple Lightning to USB camera adapter to use this device. Chord didn't want to share their proprietary internal technology with Apple, which I don't blame them, but because of that you're stuck with the camera adapter and then a USB to USB micro cable too, a little unwieldy at times for portable duty, but a Chord module is supposed to be forthcoming which remedies this.

For the outputs, a somewhat surprising choice considering the glut of balanced headphone amps out there, the Mojo has two 3.5mm mini outputs, one for you and one for a friend. I'm a bit disappointed about this as 3.5mm mini connectors are known to lose their internal "springiness" over time and you end up with a static-y/spotty connection. A friend of mine here in Baltimore just learned this lesson the hard way with his $3K Astell and Kern. I'd hate to discover what the cost to replace those jacks are. I do understand Chord wanted to sell this to the largest audience possible, so it was a good business decision. I haven't opened the Mojo up yet, but it might be an easy drop in replacement, who knows. Most mini jacks tend to follow the same solder patterns. The output on these little 3.5mm minis is 35mW @ 600 Ohms, and a solid 720mW @ 8 Ohms. Output impedance is 0.075 Ohms.

You may be wondering the size, the unit is roughly 3 1/4" x 2 1/3" x 1". It has a nice weight, the weight of perceived quality, being what appears to be thickly milled aluminum, or as the Brits say, aluminium. I've lined up a number of portable amps here to give you an idea of size. AS you can see, it's a little smaller than an Altoids tin. 


One of the most pleasing things about the unit is the haptics, where you interact with the unit using three little translucent globes. The globes can be spun about, but will only respond when pressed down. They control the power, volume, and you can also use them in combination to adjust brightness level of the LEDs behind them, etc. If you're like myself, you will spin the globes around mindlessly while getting lost in the magical sound reproduction. 

So with all the boring stuff out of the way, how does it sound? That's really all that matters, right? 

You'll be pleased to know that the Chord sounds very impressive. I rarely recommend audio gear unless I feel that it's going to sound really good to most people, and I have no problem recommending the Chord Mojo. Listening on both the Audeze LCD-X and the Cardas A8 Ear Speakers, both with Zynsonix Ballista cables, the sound has a very appropriate level of detail. There's zero instance of fatigue, and has a nice warmth about it that allows it to get along with most headphones, even slightly forward ones. There is no sign of graininess, the presentation is full, but mildly restrained in the bass. Compared to the Cayin C6, another DAC/amp combo that's about 30% larger, the Chord outclassed it without much effort. 

Chord Mojo versus the Cayin C6 Amp and DAC

The C6 is more of a giver with the bass, but that's to be expected, it drains it's battery quite quickly. The sound however has more grain, a slight shrillness in the upper midrange not present with the Chord, a more compressed soundstage, and less syrupy smoothness that makes the Mojo so pleasant to listen to. Not to say the C6 is a stinker, it's quite good and much better sounding than the iPhone's headphone output, but there's a solid 10-15% increase in relative quality with the Mojo. 

The Chord Mojo with Cardas A8 and Zynsonix Ballista Cable


Should I buy a Chord Mojo? 

If you enjoy listening to music from your phone while travelling, spending $600 isn't going to piss off your significant other, and can get over the two cable adapters (with iPhone) and lack of balanced outputs, the Chord Mojo is a great purchase that you won't regret. I would encourage you to purchase a right angle Zynsonix headphone cable to reduce the stress on your 3.5mm jacks so they last longer, and you'll get better sound while you're at it. 


DIY Audio Blog does not have any affiliation with Chord Electronics Limited and did not receive any compensation and/or complementary review units for this review. 


Building a Mini Audio Rack with Bamboo Cutting Boards

$
0
0
As you may have noticed, we are at the age of the computer audiophile, and standardized 19" components are no longer relegated to audio racks because they are typically sitting near a computer rig on a desk. I personally think that's awesome as I'm not a fan of wasted space, components should be the exact size they need to be to house the internals (at least that's my opinion). The fly in the ointment is that you may have a stack of mini components that might not sit on top of one another neatly or may need a little more space to dissipate heat.

Two companies that I've seen offer mini racks with specific dimensions to match their products, a mini rack from Parasound, and iFi Audio with their cool little iRack. Unfortunately these products only work with their specific component counterparts and are not universal.

iFi Audio iRack

So I decided the easiest way to attack this problem is to build a mini shelf from wood, and typically cutting boards are an appropriate size to sit components on. To keep the cost low while still being visually appealing, I selected the Totally Bamboo 12.5" x 8" Aruba cutting board, which were around $14 each if I recall correctly.

12.5" x 8" Aruba bamboo cutting board

To fasten the boards together, I purchased a 5/8" dowel from the hardware store. Home Depot or Lowes will typically have pine and possibly walnut or oak, which aren't a perfect match, but good enough after stain. I searched a bit for bamboo dowels, but not much luck online for the thickness needed.

First the bamboo boards needed sanding so they would accept stain evenly. NOTE: I do not vouch for the safety of whatever adhesive is used by Totally Bamboo to fasten this board together, so sand at your own risk. A reasonable person would assume it is safe as it is being used with food products, but who knows these days.

I measured a short distance from each corner and drilled 5/8" holes (and Dremeled a bit for clearance) just under 1/2" into each board. A pilot hole for a size #6 screw was drilled into the center of each hole. I then measured the component that would be on the bottom shelf to determine how long the dowels should be, added 1" and cut with a band saw. pilot holes were drilled in the center of each dowel for a #6 screw. The dowels were then inserted into the holes, 1" EAR isolation feet lined up on the other side, and a 1.5" wood screw drilled in for each.

The EAR Isolation feet are 95 cents a pop (at the time of this writing) and you can get them from PartsConnexion, or if you need a large quantity, reach directly out to EAR. I use them for nearly everything.

EAR 25mm isolation feet

After that, I lined up the holes on the other board to fit, put a small amount of wood glue in each hole and let stand upside down to dry so the glue doesn't run down the dowels. Once everything is dry, the stain/finish was applied. I used Minwax Polyshades for quickness and affordability (a 1/2 pint will run around $5). 

Minwax Polyshades - cheap and quick

After four coats, the mini rack had a nice deep glossy sheen and the dowels were pretty close in hue to the cutting boards.


Below you can see an MHDT Constantine tucked in neatly on the bottom shelf, and a Peachtree t1 SPDIF to USB converter, and Schiit Wyrd USB power isolator on the top shelf. Neat, tidy and isolated from vibration.


Hope you enjoyed this relatively simple build. I found it provides a good solution to a common problem for computer or DAP-based systems (or small headphone amplifiers).


Disclaimer: The above steps detailing the building of a mini audio rack are for entertainment purposes only and not intended to be used as directions. The owner of this blog and all associated parties can not / will not be held responsible if you attempt the process posted and cause physical harm to yourself, your surroundings or your property. Please note that some bamboo boards can contain dangerous chemicals, sand/cut at your own risk. 


Fostex T50RP mk III Modded Build - New Cups, Cable, the works!

$
0
0
If you've been following my posts you'll see I usually leave audio products alone once I get them ... kidding ;) I picked up a Fostex T50RP mk3 (or mk III, however you want to write it) so I could see the differences from the original T50RP I modded. Other than a different headband, removeable cable, and different handling of the felt behind the driver, there was no difference, so I suggest if you are already modding, go with the original as it's cheaper and you can set up the felt however you like. If you still want the mk3, You may consider purchasing across the pond, it seems like Fostex has a deal with U.S. retailers that they can't advertise below $159.99, but it averages around $130 in the UK... much more palatable as you're replacing everything anyway.

The headband is worlds better than the original model

The removable cable was a nice new feature on the mk III

I had some very nice wood cups CNC cut for me by my friend Fewzi (if you'd like his contact information, shoot me a message, we're hoping to offer at Zynsonix soon), the quality of the machining is excellent, perfect driver fit. CNC machining has really changed the way a lot of things are manufactured in a positive way, the amount of precision it offers is outstanding. Anyway, the wood cups rock. There is the cup itself, a second wood layer with a square hole that holds the driver in place, and a third plastic layer that holds the ear pads in place.

Driver frame and wood cup, ultimate precision

This picture below shows a wood ring and plastic ring for the earpads, Fewzi discovered that plastic was more durable for the earpads to stretch over (it's a tight fit). 


First the stock pads and foam are removed.


Then the driver frame is unscrewed (4 screws), and the driver unscrewed from the frame (3 screws). There is an extremely thin gasket that sandwiches between the driver and frame that needs to be handled gently. 


The drivers are snipped free and then I had to remember how to get the cups off. I didn't want to read my existing post because I enjoy discovering how things come apart and go back together. Fostex hides the screw behind a thin shroud of plastic, which I believe is sonically welded in place (micro-vibrations that fuse plastic together). It comes off with a razor, and once unscrewed, releases the clamp on the other side.


That's about the only unusual aspect of the assembly. Once everything is apart, the wood cup was fitted. There are little brass fittings included with the wood cup (the original plastic ones are too small) that allow the cup to pivot when screwed in, I found the sizing of the brass fitting and tightness of the screw makes a huge difference in the articulation. 

If anyone has heard a T50RP,  modified or otherwise, they know there is no lacking in the bass department. this is where mass damping plays an interesting part. Adding loaded sheets like Dynamat Xtreme can help curtail flabby bass and tighten things up. Adding foam with a texture can also assist with reducing reverberation / standing waves in the cup. 


The cups included 3.5mm mini inlets, which are great, but I personally like the mini XLR for headphones due to it's locking mechanism, and I could configure it the same as Audeze headphones, which you can read more about here. The driver is fastened on to the wood frame, which was a fantastic fit, with the gasket in place. Wiring up is a simple ordeal, but I wanted to ensure all the original solder was removed so I could replace the tin solder with Cardas Quadeutectic solder. The tabs are marked with a "+" and "-". Below you have a view of both sides being soldered in. 


Once the drivers are happy, the frame is lined up on the cup and it's important to ensure no stress is on the solder pads, so loose wiring is okay here. Then the earpad frames are sat on top and four screws replaced. The foam that was set aside in the first step is replaced in each cup. 


This could be no exciting rebuild without fancy pads. Fortunately there are a couple different types available from ZMF (run by Zack, cool bro), and MrSpeakers. ZMF has a number of pads available, including lambskin, cowhide, protein, and Omni. MrSpeakers offers the Alphapads which are lambskin. Lambskin seems to be the most popular headphone pad material for higher end headphones, for which I am glad, I hate velvet ;) ZMF also has a nice "pilot pad" to provide some extra cushion on the top of your head.

ZMF lambskin earpads and pilot pad

Now that we're all padded up, we have what appears to be a finished headphone, but wait...


...where's the cable you ask?! We won't have any sound if we don't have a cable. Where will we get a cable from?

Image result for gasp cartoon

Fortunately, we have the brand new Zynsonix Ballista cable here, featuring 28 strands of ultra pure ohno cast copper, 12 of which are clad with high purity silver in an alternating geometry, then each are electrically isolated with a clear coat, fed through low loss dielectric, resulting in an extremely well balanced sound with great detail retrieval... completely custom made for Zynsonix. 


There we go, now we're talking! 

I'm now going to reveal a special secret that will enhance your life forever make your cans sound better... you can get the Zynsonix Ballista configured for pretty much any headphone you have. It's the best cable I've made to date, I spared no expense, because you guys deserve it. Use the handy dandy contact link to share what you need. Also if you are interested in purchasing some great sounding cups, feel free to reach out as well. Fewzi is experimenting with some additional woods now, so there should be a variety of species to choose from. 

Anyway, that's all from me. Happy listening, building, etc. and don't be a stranger if you'd like to shoot me an email


Disclaimer: The above steps detailing the building of a headphone are for entertainment purposes only and not intended to be used as directions. The owner of this blog and all associated parties can not / will not be held responsible if you attempt the process posted and cause physical harm to yourself, your surroundings or your property.

Fostex T50RP mk III Modded Build - New Cups, Cable, the works!

$
0
0
If you've been following my posts you'll see I usually leave audio products alone once I get them ... kidding ;) I picked up a Fostex T50RP mk3 (or mk III, however you want to write it) so I could see the differences from the original T50RP I modded. Other than a different headband, removeable cable, and different handling of the felt behind the driver, there was no difference, so I suggest if you are already modding, go with the original as it's cheaper and you can set up the felt however you like. If you still want the mk3, You may consider purchasing across the pond, it seems like Fostex has a deal with U.S. retailers that they can't advertise below $159.99, but it averages around $130 in the UK... much more palatable as you're replacing everything anyway.

The headband is worlds better than the original model

The removable cable was a nice new feature on the mk III

I had some very nice wood cups CNC cut for me by my friend Fewzi (if you'd like his contact information, shoot me a message, we're hoping to offer at Zynsonix soon), the quality of the machining is excellent, perfect driver fit. CNC machining has really changed the way a lot of things are manufactured in a positive way, the amount of precision it offers is outstanding. Anyway, the wood cups rock. There is the cup itself, a second wood layer with a square hole that holds the driver in place, and a third plastic layer that holds the ear pads in place.

Driver frame and wood cup, ultimate precision

This picture below shows a wood ring and plastic ring for the earpads, Fewzi discovered that plastic was more durable for the earpads to stretch over (it's a tight fit). 


First the stock pads and foam are removed.


Then the driver frame is unscrewed (4 screws), and the driver unscrewed from the frame (3 screws). There is an extremely thin gasket that sandwiches between the driver and frame that needs to be handled gently. 


The drivers are snipped free and then I had to remember how to get the cups off. I didn't want to read my existing post because I enjoy discovering how things come apart and go back together. Fostex hides the screw behind a thin shroud of plastic, which I believe is sonically welded in place (micro-vibrations that fuse plastic together). It comes off with a razor, and once unscrewed, releases the clamp on the other side.


That's about the only unusual aspect of the assembly. Once everything is apart, the wood cup was fitted. There are little brass fittings included with the wood cup (the original plastic ones are too small) that allow the cup to pivot when screwed in, I found the sizing of the brass fitting and tightness of the screw makes a huge difference in the articulation. 

If anyone has heard a T50RP,  modified or otherwise, they know there is no lacking in the bass department. this is where mass damping plays an interesting part. Adding loaded sheets like Dynamat Xtreme can help curtail flabby bass and tighten things up. Adding foam with a texture can also assist with reducing reverberation / standing waves in the cup. 


The cups included 3.5mm mini inlets, which are great, but I personally like the mini XLR for headphones due to it's locking mechanism, and I could configure it the same as Audeze headphones, which you can read more about here. The driver is fastened on to the wood frame, which was a fantastic fit, with the gasket in place. Wiring up is a simple ordeal, but I wanted to ensure all the original solder was removed so I could replace the tin solder with Cardas Quadeutectic solder. The tabs are marked with a "+" and "-". Below you have a view of both sides being soldered in. 


Once the drivers are happy, the frame is lined up on the cup and it's important to ensure no stress is on the solder pads, so loose wiring is okay here. Then the earpad frames are sat on top and four screws replaced. The foam that was set aside in the first step is replaced in each cup. 


This could be no exciting rebuild without fancy pads. Fortunately there are a couple different types available from ZMF (run by Zack, cool bro), and MrSpeakers. ZMF has a number of pads available, including lambskin, cowhide, protein, and Omni. MrSpeakers offers the Alphapads which are lambskin. Lambskin seems to be the most popular headphone pad material for higher end headphones, for which I am glad, I hate velvet ;) ZMF also has a nice "pilot pad" to provide some extra cushion on the top of your head.

ZMF lambskin earpads and pilot pad

Now that we're all padded up, we have what appears to be a finished headphone, but wait...


...where's the cable you ask?! We won't have any sound if we don't have a cable. Where will we get a cable from?

Image result for gasp cartoon

Fortunately, we have the brand new Zynsonix Ballista cable here, featuring 28 strands of ultra pure ohno cast copper, 12 of which are clad with high purity silver in an alternating geometry, then each are electrically isolated with a clear coat, fed through low loss dielectric, resulting in an extremely well balanced sound with great detail retrieval... completely custom made for Zynsonix. 


There we go, now we're talking! 

I'm now going to reveal a special secret that will enhance your life forever make your cans sound better... you can get the Zynsonix Ballista configured for pretty much any headphone you have. It's the best cable I've made to date, I spared no expense, because you guys deserve it. Use the handy dandy contact link to share what you need. Also if you are interested in purchasing some great sounding cups, feel free to reach out as well. Fewzi is experimenting with some additional woods now, so there should be a variety of species to choose from. 

Anyway, that's all from me. Happy listening, building, etc. and don't be a stranger.


Disclaimer: The above steps detailing the building of a headphone are for entertainment purposes only and not intended to be used as directions. The owner of this blog and all associated parties can not / will not be held responsible if you attempt the process posted and cause physical harm to yourself, your surroundings or your property.

Recabling the Beyerdynamic Tesla DT-1350 Portable Headphones

$
0
0
Beyerdynamic has a number of different headphones featuring Tesla drivers now. Some are very impressive, like the Beyer T-1 and T-5p (see my recable of the T-5p here) and some aren't really my cup of tea, such as the Beyer T-70 with what I perceived to be a bright and peaky sound signature. So if you are considering purchasing one of the Beyerdynamics with Tesla drivers, to audition it before purchase if you can. In this post I will be recabling the Beyerdynamic DT-1350 portable headphones with Tesla drivers.

Like all Beyerdynamic headphones I've ever used, the DT-1350 is robustly built and designed to withstand many hours of use. The headphone splits in the center, much like the Sennheiser HD25-1 II headphones, for additional adjustment and comfort. The drivers have an 80 ohm impedance, so a headphone amp can be beneficial to bring out the best in these. Overall, I would say that the sound very clear, coherent, and is more concentrated on the higher end of the spectrum, more treble-oriented with a bit less bass quantity than I'd desire. I could see the similarity in signature to the DT880 250ohm headphones, which many audio enthusiasts enjoy for their even-handed presentation.

So in order to add a little warmth and bass to the equation, I decided to recable the DT1350s with Cardas internally litzed wiring. The Cardas 2x23.5 is a great size for portable headphones when you don't need balanced operation. It's relatively flexible and thin for an aftermarket cable. I also chose to use an Oyaide rhodium plated plug (see here for a 3.5mm plug rundown) as it works great with portable devices such as a phone with a case on it due to the slim barrel.

Oyaide Rhodium Plug and Cardas wiring

The end of the wire is stripped revealing two 23.5 gauge conductors and a shield which will be used for the ground (also called return). You'll note the Oyaide connector has teensie-tiny soldering areas, so care is required to ensure there is no shorting of the left and right channels or melting of the dielectric.

Stripped Cardas Wiring

As you can see, the Cardas wire fits perfectly in the thin barrel of the Oyaide connector, no drilling or dremmeling was required. 


With the cable ready for installation, the Beyerdynamic cups would be opened. The pads are held on with a sticky tack that goes around the outer circumference. In my experience, they can be pulled off with a bit of force and reinstalled without losing the tackiness, although I'm sure if removed multiple times, they would need to be replaced, or some sort of double sided tape might need to be installed.

Examining the interior, the Tesla driver is hiding under this white plastic shell, so not quite as fancy as the interior of the T5p. The wiring attaches to a small solder board, which allows the ground to be split, and would potentially protect the driver solder pads if there was some major yanking on the wire.

Beyerdynamic DT1350 with driver exposed

Installing the Cardas wire requires the existing wire entry area to be Dremelled slightly to accomodate the larger cable. Holding it in place is a pair of miniature zip ties and epoxy to ensure that when the wire is pulled, it will not damage the solder joints inside the cup. Heatshrink is used to provide some additional strain relief. The wire is soldered to the solder pad that distributes the different channel signals and ground to each of the earcups. 

Note the soldering pad near the top of the cup


After the soldering work is complete, the driver is returned to its original position.


The tacky pad is replaced on the headphone cup and the recable is now complete. 

A complete DT1350 with Cardas cable

If you'd like to purchase a new pair of pads for the DT1350, Beyer offers original replacements (of course) and they have some suede-type pads which some people find more comfortable for longer listening sessions. That part number is 908363 and can be purchased from Beyerdynamic USA. 

Suede Pads from Beyerdynamic

The DT1350s come with a very nice traveler case, and the recabled version fits inside just fine. 


So after performing the recable, the DT1350 has what I would perceive to be a warmer and deeper sound signature. It doesn't rival the Amperiors or HD-25 aluminums for bass quantity, but it has a nice, palpable midrange and upper treble presentation that other headphones can't match. 


The Fine Print: The above steps detailing the recabling of a headphone are for entertainment purposes only, and not to be performed under any circumstances. The owner of this blog and all associated parties can not / will not be held responsible if you attempt the process posted and cause physical harm to yourself, your surroundings or your property. Please keep this in mind.


Balanced Audio Switchbox - Audiophile Quality

$
0
0
If you're an audio purist, it can be worrisome adding components in the signal path, even if it enhances convenience during your listening sessions. This is compounded even further if you are taking a delicate signal from a turntable to a phono pre. It doesn't make sense to to spend all that money on fancy interconnects if they are plugged into a switchbox with a low-quality switch, forcing the signal to travel across questionable metal contacts that may not be making a secure connection. That being said, everyone appreciates being able to change inputs and/or outputs at the turn of a knob. There's an easy solution, use the best materials available so the switchbox will be as transparent as possible.

A great client of mine, Todd, wanted a balanced switchbox that would fit conveniently on his rack and not harm the signal. Based on the sizing constraints, he chose a size that would match his Schiit Audio Mjolnir 2 headphone amplifier and fit conveniently underneath. We selected a Par-Metal 16" wide aluminum case (20-16123x) that matched the dimensions perfectly, anodized with alodine for EMI/RFI shielding, and black on the exterior.

Par Metal aluminum chassis 20-16123x

The unit would have a single pair of balanced XLR inputs, and four pair of balanced XLR outputs. I selected the Neutrik DLX series with heavy duty shielding. As Neutrik states on their page: "[the] all metal housing works in combination with a new duplex ground contact yielding the best RF protection and ground conductivity in a chassis mount XLR". Creating the holes in the back chassis panel simply requires using a ruler to plan out where the holes would be cut. Greenlee makes an excellent punch for D-size mounting dimensions. The D mount specification calls for a 23.80mm (0.9370") diameter hole, but a 15/16" hole is 0.9375" and works perfectly well. As you've likely seen in many of my other posts, I use these punches a lot. You drill a pilot hole, insert the bolt and tighten with a ratchet and you get a nice accurate punch every time.


Greenlee 15/16" Metal Punch

The XLR connectors can be inserted from the back for a clean mount. I chose to use pop-rivets to install the connectors as I like the look, however, a screw, nut and lock washer would also suffice. 

Aluminum pop-rivet

Installing the D mount XLRs on the back panel 

Below you'll note the D-mount XLRs installed. Despite being directly installed to the metal chassis, solid grounding is very important, so a bus wire is run across the chassis ground pin on each unit, and each unit is shorted to the metal surrounding the plug. You'll also note the mount for the switch has been installed a little past the halfway point on the chassis.


Bottoms up!


And here comes the fun part, wiring. I encourage labeling the chassis interior which won't be visible after completion so you don't get mixed up during the wiring process. In this case, one wafer (or level) on the switch is dedicated to the right signal (both positive and negative), and the other to the left (+ and -). At any given time, four connections are being made: L+, L-, R+, R-. The Elma switch selected is really nice quality, make before break, with Swiss movement, gold plated connectors, the works. Solid core UP-OCC in teflon wire is being used for all connections. The shaft extension rod is a general cut-to-size unit with lock-nuts and a brass fitting. 


Wiring up the Elma switch

I do like to tidy up the wiring after the fact with a few zip-ties, although this is not a necessary step. 


For a nice finishing touch, brass plates are engraved to fasten to the chassis.


The front art I created in Adobe Illustrator in EPS format so the engravers could use it. This was the design Todd and I collaborated on. The knob is knurled aluminum from Goldpoint and has a nice solid weight and feel. I added a bit of J.B. Weld to the connections on the shaft extension to ensure they wouldn't loosen up over time and annoy poor Todd.

Engraved brass plate

Goldpoint milled aluminum knob


And some final photos to see the finished product. The footers are EAR isolation feet.


Balanced Switchbox Front


Balanced Switchbox Back

The Fine Print:
The above steps detailing the creation of a switchbox are for entertainment purposes only are not intended to be instructional. The owner of this blog and all associated parties can not / will not be held responsible if you attempt the process posted and cause physical harm to yourself, your surroundings or your property.

Tube Kits, Solid State Kits, PCBs, Transformers, and Where to Buy

$
0
0
I've been quite busy over the last couple of years and haven't been able to build as much as I would have liked, but now that I'm getting back into the swing of things, there are a number of DIY providers who have left the space, so I wanted to put together a list of all the great companies who still offer DIY kits, boards, transformers, etc. I hope it's of use to you, and please try to support the DIY community in any way you can. There's not much money in selling just boards, it's more of a community service in many cases. This is a growing list and I'll be adding more as time goes on.


AMB Labs (Solid State board and part provider): Ti Kan has lots of great solid state options including headphone amps (desktop and portable), power amps, DACs, power supplies and more. The famous β22 (Beta 22) balanced headphone amplifier is here, as well as the portable Mini³ headphone amp which shouldn't be too hard for beginners. Tons of boards and parts available and a good forum.

Beezar (Tube Amp Kits): Tom (Tomb on HeadFi) runs Beezar and offers great, proven designs from ECP Audio (The Torpedo I and II headphone amps) as well as other DACs and headphone amps. Tom puts together a great kit and the documentation is unbelievably good. Every step is illustrated similarly to the Bottlehead kits. Highly recommended and beginner friendly.

Bottlehead (Tube and Solid State Kit Provider): Bottlehead provides mostly tube builds, from headphone amplifiers, to low-wattage speaker amplifiers, to pre-amps, etc. This is a good company for the budding DIYer as the directions are very explicit with color photographs and the support is quite good. Most of the builds are point to point with a few small circuit boards here and there for constant current upgrades usually. I'm certain they've sold a truckload of Cracks, a very affordable headphone amp offering. Below is Tyll Hertsens of InnerFidelity (great site) building a Crack.


ChipAmp (Solid State PCBs and Kits): Allen at Chipamp has a fantastic array of chipamp / gainclone builds based on the LM1875, LM3886, and LM3875. He also has some great power supply, volume and switcher PCBs. Very simple and easy builds. Beginner friendly except the power amps use high amperage and would be dangerous if safety measures aren't followed carefully.

Classic Valve (Tube and Solid State PCBs): Geek at Classic Valve is getting out of the PCB business to shift his attention to building turn-key amplifiers. I encourage you to buy up what he has left. There are a number of very unique Dynaco boards for the PAS, ST70, MKIII and MKIV as well as power filters and other great stuff.

DIYTube (Tube PCBs): Shannon at DIYTube is getting out of the PCB business to shift his attention to building turn-key amplifiers. You will still find excellent documentation on DIYTube.com and a semi-active forum, however the boards are no longer available.

DynakitParts (Tube Kits, PCBs, Transformers): Kevin at Dynakit parts is an incredible guy. You can build Dynakits just like you used to back in the 1950s thanks to his incredible efforts. Dynaco, if you aren't familiar, is likely the most legendary audio kit manufacturer of all time. The ST70, their 35 watt-per-channel amplifier is a ubiquitous favorite, and their other models, including the ST35, MKIII, MKIV, and PAS pre-amp all have a very strong following. Dynakitpart's uses the original circuits, which are excellent, but perspective buyers may also use alternative boards from a variety of producers (and will need to in the case of the PAS pre-amp and SCA35 integrated). The newly designed boards have some nice attributes in some cases, but are becoming harder to obtain lately. The Quad-caps are very cool and vintage looking, but some people prefer cap boards on the inside instead. The beautiful thing is that this is DIY, and you can do whatever you like.

Glass Jar Audio (Solid State Kit Provider): Jeff is kind enough to assemble kits with designs from AMB, Cavelli, Toole and others. It's much easier to order through him than sourcing all the parts all over the place and the pricing is very reasonable.

Glassware Audio Design (Tube PCBs and Kits): Glassware has an impressive collection of designs, mostly around the Aikido circuit. You'll find pre-amps, phono pre-amps, headphone amps, volume attenuators, and power rectifier boards. Nice really thick PCBs that are well laid out and some offer the ability to fit bypass capacitors and large coupling capacitors (for DIYers who have strong opinions ;) ). Manuals and schematics are included with purchases. Not as friendly for beginners, start with Bottlehead unless you have some experience under your belt.

Triode Electronics (Tube PCBs and Kits):

Tubes4HiFi / Bob Latino:


The Fine Print: DIYAudioBlog and Zynsonix Audio, LLC does not represent or have any business affiliation with any of the above businesses or individuals. Building/modifying circuits can be dangerous to you and/or your surroundings and should only be performed by a certified technician. The owner of this blog and all associated parties can not / will not be held responsible if you attempt a build or modification posted above and cause physical harm to yourself or your surroundings. Many electronics contain high voltages that can kill, and mods, if performed improperly, can be a fire hazard. Please keep this in mind. 
Viewing all 105 articles
Browse latest View live