The AKG K702 headphone is quite simply a black AKG K701 heaphone with a removable mini 3 pin cable. It's very nice to be able to remove the cable from a headphone with the click of a button, which is where the 3 pin mini-XLR comes into play. Switchcraft is well known for these connectors and offers them in a number of different pin configurations. Clicking the little black button on these connectors allows them to disconnect from the jack, so if a user runs over their cable with the wheel of a chair, desires a shorter or longer cable, or wants a cable of higher quality, it's very easy to swap a new cable in.
Zynsonix offers replacement cables for the K702 among other headphones with removable cables if one is in the market.
With the existing 3 pin connector in the AKG K702, the two grounds for each channel are commonly connected. This won't work for a balanced connection to a balanced headphone amplifier where the grounds are run separately, so the existing three pin connector will be removed in favor of a 4 pin mini-XLR from Switchcraft.
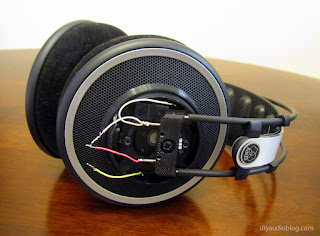
In this post, a pair of K702s will be getting repaired with some high quality Eys 99.999% pure silver wiring (5Ns) in PTFE tubing. This particular pair of K702s had the previous jack accidentally ripped out (perhaps the headbanging got a bit too frenetic ;) ), but luckily everything inside is still in good working order. (I've found that with other AKGs, getting the existing jack out can be quite tricky, requiring a Dremel tool and quite a bit of patience). One will notice in the photo below, the white wire is the ground, in which both the left and right ground are commonly connected. In order to get inside the plastic shell, the grill needs to be rotated using a pair of jewelers screwdrivers, then two small screws are removed from underneath the grill.
![]() |
| AKG K702 opened |
The first task would be to wire up the Switchcraft 4-pin mini XLR jack with silver wire, this would be replacing the existing wire within the headphone. Each piece was made a little longer than necessary and color coded for easy reference with electrical tape. The solder joints were covered with very small diameter heatshrink tubing to prevent the Teflon tubing from moving while the jack was being installed.
![]() |
| Silver wire soldered to Switchcraft mini 4 Pin jack |
Now the jack could be slipped inside of the existing plastic shell. No dremeling or filing necessary is necessary when using a genuine Switchcraft jack. A strong adhesive does need to be used to keep the jack in place however.
![]() |
| Switchcraft jack installed in the plastic shell |
The stock wiring was removed at this point, a desoldering pump used to get off excess solder, and the new wires soldered in place. The solder points for the left driver are at the left-most and right-most points, and the solder points for the right driver travel along the headphone band, which are both closer to the center. Silver wiring was wired to the to the terminals and the plastic shell and grill were reinstalled.
![]() |
| The plastic shell being reinstalled on the K702s |
At this point, the matching silver cable could be built. Starting with a 4 pin mini XLR plug, the silver wires were soldered in place and small diameter heatshrink tubing was placed over the joints to prevent slippage of the Teflon tubing.
![]() |
| 4 Pin Mini XLR plug with wires soldered in place |
The metal jack barrel was then slipped in place over the plastic piece housing the contacts.
![]() |
| Metal barrel covering plastic housing |
The wires were then braided in a litz formation and the strain relief clamped down on the wire tubing to prevent movement.
![]() |
| Silver wire braided and strain relief clamped |
The cable was then sleeved with soft black nylon multifilament. The remaining piece of the jack was filed to allow for the large diameter cable, then slipped over the sleeving and screwed to the metal barrel. A piece of adhesive black heatsrhink was added to act as an additional strain relief and help to keep the sleeving in place.
![]() |
| 4 Pin mini XLR completely installed |
![]() |
| Cable sans mini connector |
A Switchcraft mini connector could now be installed. You can see more details on a mini connector being installed in this previous post:
Silver Plated Copper Mini to RCA Cable. The cable could now be clicked into place on the now repaired AKG K702. The mini connector is inherently non-balanced, but the user can now easily upgrade to a balanced cable when they are ready.
![]() |
| Completed cable on the AKG K702 headphones |
UPDATE (6/14/12): The Quincy Jones Q702s are nearly identical, although the internal jack proved to be much more difficult to remove. The Q702s below were recabled using Zynsonix Ecs ultra pure ohno cast copper in Teflon.
![]() |
| Rewired with Zynsonix Ecs wire |
These AKGs feature a fully balanced cable.
![]() |
| Quincy Jones Q701 Balanced |
I hope you found this post entertaining. Please be sure to contact
Zynsonix if you have a pair of AKG K702 or Q701s that need rewiring, or any headphone for that matter.
The Fine Print:
The above steps detailing the repair and recabling of a headphone are for entertainment purposes only and not to be performed under any circumstances. The owner of this blog and all associated parties can not / will not be held responsible if you attempt the process posted and cause physical harm to yourself, your surroundings or your property. Please keep this in mind.